
New kit: Wisteria Flowers Felt Mobile
Introducing our latest craft kit! We’re felt flower making!

The new Wisteria Flowers Felt Mobile craft kit!
11th August
With heat waves and down pours in the forecast, it’s great to have a few craft projects on the go, and this one is perfect for bringing that summer colour from the garden indoors.
I love the colour and the fresh smell of lavender that comes out at this time of year. It’s so refreshing and energising! For me, it’s the flower that really tells me that summer is in full bloom.

Summer lavender
For this make, I really wanted to celebrate this beautiful summer colour, but this lovely felt didn’t seem to suit the tough upright stalks of lavender so the design transformed into rows of luxuriously flowing Wisteria flowers.

A stunning photo of wisteria
I love how these designs transform in front of me. You never quite end up with what you intended to make. That’s just one of the wonderful things about creativity, standing back and watching it evolve and take on a life of it’s own. I usually make 2 or 3 prototypes before the final make on the video guide. They never look quite as good but I think you can tell when there’s some potential.

One of my earlier designs. The final craft kit gets an upgrade on the felt which makes it look much better quality and I’ve adjusted a few things to make it neater, but the basics are there!
The Eco Credentials
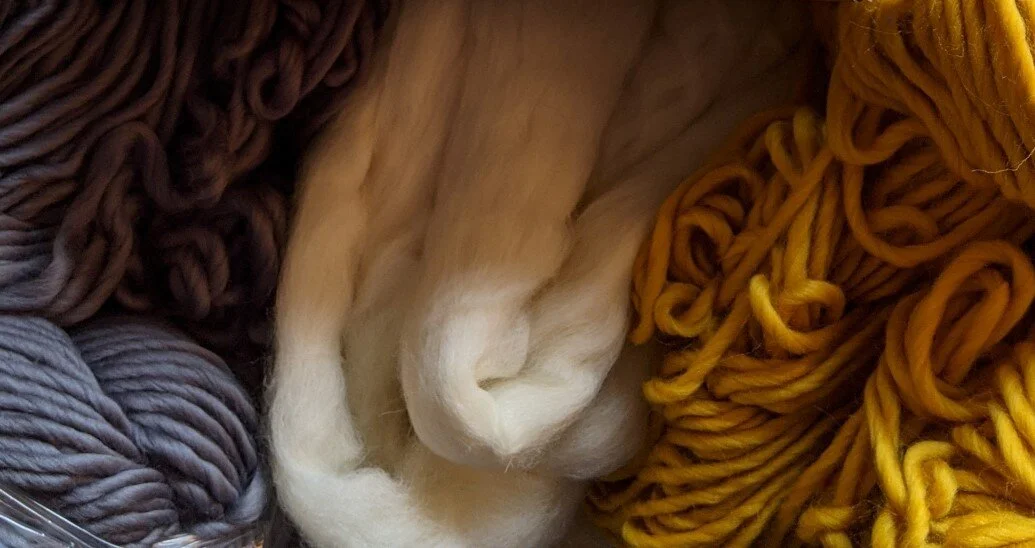
Who doesn’t love felt? At some point in our lives we’ve all crafted with soft, fluffy, multi-coloured felt. It’s one of the first things that we craft with at school. But how many of us know what it really is?
Traditionally felt is made using wool. A barbed needle or set of needles are used to slowly mesh the fibres together to make a sheet of felt fabric. You can have a go at making felt from wool if you grab our Needle Felting Heart Garland kit from the online shop.
Nowadays, most of the felt you’ll find is made from polyester (plastic). Why? It’s cheap! So cheap! You can get a stack of plastic felt for pennies whereas 100% wool felt can be at least 10 times the price. 100% wool felt is incredible. It’s so soft and strong and is an amazing insulator. So if you’re making something special or adding it to clothing, you’ve got a winner there. But, luckily for us eco crafters on a budget, there is a more cost effective option.
Wool/viscose blends! This is wool blended with cellulose from plants. It’s not as cheap as plastic felt but it’s much much cheaper than 100% wool and it performs and feels much more like a wool felt. That’s what I’ve chosen for this mobile and it wouldn’t work without it.

Love these summer purples together
Go Get creative
Fancy having a go? Just click the button below to explore beautiful eco friendly crafting. Start your creative journey here!

New kit: Bargello Tealights!
Introducing our latest craft kit! Bargello tealights!

The new Bargello Tealights craft kit!
30th June
This crafty summer full on sunshine and rain keeps rolling on and I have another kit to introduce to you! I’m really keen to make kits that fit the seasons and I think this one does the trick. The kit makes 3 woolly, Boho tealights. I can just see these making the perfect addition to a late night barbecue in the garden! They each come with 3 soy wax candles so you’re all sorted!
What is Bargello?
Yes, good question! You might not have heard about it, but it’s one of this year’s biggest crafting trends. It’s a type of needle point using regular geometric patterns, usually in bright colours. People are really loving now easy this craft is and the eye catching designs you get. Originally Bargello was used as a way to embroider furniture as it’s so hard wearing.

Close up you can see the squares in the jute
I’ve wanted to try some embroidery for a while but I’m not a massive fan of anything fiddly with a needle. When I found Bargello I loved how easy it was. The patterns are super easy to follow and you can get into that really lovely, mindful, repetitive action.
This is also just a super craft to make in the sunshine. You’re working with short lengths of wool and you don’t really need a work surface. I made lots of versions of these sitting in the garden!

Lids off and ready for lighting!
The Eco Credentials
The trend this year is to use plastic needlepoint canvas but, of course, we’ve put an eco-friendly spin on things. Rather than the plastic canvas we’re using super sustainable Jute. I just love the stuff! I have tried plastic canvas and I find that often the needle gets stuck in the holes. Jute feels much smoother to work with and it’s still really strong.
We’re using my favourite yarn in this kit as well. It’s a Merino/silk blend. It’s lovely and soft to work with whilst being sustainable and strong.
I know it’s hard to get excited about glass jars, however, I’ve ordered these from one of my usual UK suppliers and they’re awesome at packaging with the absolute minimum amount of plastic! Thanks guys!

Nearly finished!
Go Get creative
Fancy having a go? Just click the button below to explore beautiful eco friendly crafting. Start your creative journey here!

The Craft Box Club Story
The Craft Box Club Story

On a mission to spread eco crafts!
7th May 2021
“On a mission to show that crafting doesn’t have to cost the Earth”
I was always a creative kid. I wish I’d known! My childhood was filled with lego creations. The kits never lasted long before they were altered, embellished or transformed into something completely new. Bath time was for mixing potions, carefully left to brew overnight with the expectation of something magical, one day…surely! I used to obsessively make little flip books or adventure stories where you could choose your ending. I discovered a passion for music, teaching myself bass and crashing as many after school bands as I could. Whilst travelling, I taught myself some Green Day songs on a borrowed guitar. At uni I formed an indie rock band writing songs and playing loads of gigs.
“People would say, “you’re quite creative aren’t you!”. I used to laugh “are you kidding! Have you seen my awful handwriting!”.”
People would say, “you’re quite creative aren’t you!”. I used to laugh “are you kidding! Have you seen my awful handwriting!”. I’m dyslexic. Handwriting lessons were the absolute pinnacle of oppression. Creative, to me meant, you can draw, you can paint, basically, you can see something in real life and make it appear in front of you as a neat and finished work of art!

I’ve learned that creativity is both, much more and much less than that. Creativity can be about music and design and programming and philosophy and changing the world. It can also be as simple, silly and fun as putting some lab coats on and throwing paint at each other. At it’s simplest, it’s just making a thing. And that’s what I love. So I get it now, I am creative!
“We all have a desire, to make, it’s within each one of us and it’s deeply human.”
We all have a desire, to make, it’s within each one of us and it’s deeply human. We wouldn’t have got to where we are as a species without making. We all have a need to take what’s inside our heads and make it tangible. Creativity gives us purpose and grounds us in the world. Like many of us, I struggled for years to try to find creativity in my corporate job. Working as an analyst I’d design more and more outlandish graphics and learned to code to build the best interactive apps and dashboards. But it wasn’t enough.
I was hungry to make something more tangible, and to learn real life craft skills. First, I tried craft workshops, but it was really tough to fit in workshops around work and time with my daughter in the evenings. Then I turned to craft kits, but they just didn’t work for me! The instructions were hard to follow, the designs were never really anything I wanted to keep and, worst of all, these kits were full of more plastic than crafts! I wasn’t alone, I knew loads of people who’d get painting kits as a gift but never got round to using them. They’d inevitably end up in the bin and add to the ever-growing landfill.
“Craft Box Club is my reaction to this problem. I want to empower people to feel their own creativity. To have a safe space to learn real life craft skills and give them the “I made that” moment.”
Craft Box Club is my reaction to this problem. I want to empower people to feel their own creativity. To have a safe space to learn real life craft skills and give them the “I made that” moment. I want them to actually want to make the design in the kits. It should be really easy for people to understand what to do, a fiddle free, enjoyable process. I want people to be able to make without the need for any plastic packing and kit that breaks after a single use. I want creativity that doesn’t cost the Earth.
So…all the craft projects are designed to be something that you want to show off. I spend loads of time sourcing the best natural materials available. I go to great lengths to find the most sustainable packaging whether it’s traditional material like wood wool or innovative biodegradable “plastics” made from cellulose. All the kits come with really easy to follow video and step by step guides as well as optional one to one sessions with me to sort out any niggles.

I have absolutely loved connecting with people over craft. I’ve had wonderful reviews and have been told touching stories of families and friends sharing crafts over lockdown. I’m most moved by the part that crafting can play in completely changing people’s lives. Giving a relative something to keep loneliness at bay, an excuse to reach out to a support group after a loss, reigniting a long forgotten passion for creativity. I love how crafts can improve lives and, when you craft with nature, connect you with life, your environment and our precious planet.

Go Get creative
Have I inspired you to get creative yet? YES!? Amazing! Good choice! Just click below to explore beautiful eco friendly crafting. Start your creative journey here!

New kit: Painted Pink Beach Houses
Introducing our latest craft kit!

The new Painted pink beach house craft kit
25th May 2021
I have to say that went I planned on releasing this kit in May, I was imagining longer, warmer days, bathed in sunshine! It’s not quite turned out like that has it? My part of the world has been battered with storms and soaked with endless downpours all month! Though this kit might not be hailing the summer, at least it provides some hope of blue skies ahead!

Seaside beach huts, inspired this kit
The inspiration for this kit came to me during a long weekend in the beautiful little seaside town of Lyme Regis last year. It was my first holiday with girlfriend Emma and it was just heaven! We managed to squeeze it in between lockdowns and it was amazing to get to spend so much time together after so much time apart.
I loved the little painted beach houses that you find in so many of the shops in town. They were all totally unique and full of pretty pastel colours. I was quite touched when Emma bought me 2 mini beach houses for Christmas last year and I’ve wanted to see if I could recreate them ever since.
Though these houses are definitely connected with the British seaside, the pink colour takes me back to my childhood spent in Bermuda. Most of the houses of the little island are painted bright colours. The most popular colour of all, pastel pink, to blend with their pink tinted sandy beaches!

Sandy Bermuda beach
The craft - Powdered Earth Paints
This is a super simple craft. It’s all about painting and decorating little seaside houses. First you apply a based coat, then paint on the details to make it look just little a little model house. I’ve supplied string, glue and a few extra to decorate the house. The guide shows you how I finished my design but I’d definitely encourage you to go freestyle if you feel it.
Even though the design is simple, there is some fine detail to apply here. The best approach is to slow down, take a deep breath and relax into it. I found it really meditative. And don’t forget, if it’s not perfect, don’t worry! Beach houses are never perfect. The style is rustic and lashed by decades of salty winds!
The Eco credentials
Oh no, there are plastic bags in this kit! NO! Don’t panic! It might look like the paint comes in plastic bags but it’s not plastic, it’s cellulose. That means that everything is home compostable.
The paints are the star of the show in this kit. They’re powdered earth paints so they’re made of pure earth minerals. Nothing nasty added and you just add water! I still can’t believe the diversity of colours you can get using earth paints and they’re just so much better for the environment than acrylic paints in little plastic pots.
I love the rustic look of the string which outlines the roofs of this design and you get a few other materials to make your house look extra beachy.
The video guide that comes with this craft kit gives you super clear instructions of how to recreate my design but I’d love you to go freestyle!
Painting video guide
Go Get creative
Fancy having a go? Just click the button below to explore beautiful eco friendly crafting. Start your creative journey here!

New kit: Needle Punch Jute Bag
Introducing our latest craft kit!
The new needle punch jute bag
20th March 2021
It’s March and the first day of spring! I really feel like I’m coming out of hibernation. The days are getting longer, the air is getting warmer (slowly, this is England after all), and the garden is starting to explode with colour! The latest Craft Box Club kit has a super spring vibe with Daffodils all over the place!

Spring Daffodils, inspired this kit
I’ve been trying to green up my work space recently as, like so many of us, I’m spending way more time at home than ever and the winter weather has been keeping me indoors more than usual. I’ve invested in this little chap, Cedric the Cheese Plant to green my office. I love this feeling of bringing the outside in and it helps to strengthen my connection with nature!

The craft - Needle punch
If you’re new to needle punch, you’re in for a treat! It’s a super simple way of embroidering fabric, particularly good for anything with an open weave. You thread your needle with yarn or thread and push it into the fabric, usually something like cotton monks cloth. Each stab of your needle leaves loops in the fabric which create a pattern.
Many needle punch kits you’ll find will show you how to create a decorative pattern in an embroidery hoop which is great, but I know that my subscribers love their makes to be practical. That’s why we’re going to be decorating a super cool, super useful, jute shopper!
The Eco credentials
Yes the shopping bags in this kit are make of strong, sustainable jute! A brilliant choice for a reusable shopping bag! But watch out! When searching for these bags I found out that most jute shoppers are lined with, yes, PLASTIC! I couldn’t believe it. Beautiful natural material on the outside but for some reasons people seem to think they need a layer of plastic on the inside. Why!!?!?! So I’ve gone for the unlined version.
The yarn in this craft kit is from one of my fave suppliers, World of Wool, based on Yorkshire. This wool is amazing quality and plastic free. It’s a merino wool and silk blend. Again, strong and sustainable! Thanks guys!
Top Tips for needle punching Jute
OK, so needle punching into Jute is a bit different. Yes, it’s harder work than punching into monks cloth but I think it’s worth it so you can create an brilliant effect on an awesome, robust material.
Be careful! - It might not look it but the end of the needle is sharp and you’ll need to push pretty hard.
Get in the flow - Make sure that your yarn can flow easily through the needle.
Keep it close - Keep the needle tip close to the fabric. Don’t pull the needle away too much or the stitch will fall out.
Be gentle but firm - Apply gentle pressure to the needle when punching into the fabric.
Give a helping hand - You may need to give each stich a pinch from behind the fabric to hold it in place.
The video guide that comes with this craft kit gives you super clear, up close instructions to make this work.

Needle punching guide
Go Get creative
Fancy having a go? Just click the button below to explore beautiful eco friendly crafting. Start your creative journey here!

New kit: Heart Felt Garland
Bold, bright and beautiful way to bring love into your crafting!

The new needle felting kit - the Heart Felt Garland!
14th February 2021
It’s Valentine’s day and I’m feeling pretty loved up! I really wanted to bring that into the new kit this month! I’ve also loved all of the rainbow art that I’ve seen everywhere over the past few months. Rainbows have been adopted as the symbol for so many causes but at their heart, they stand for hope. Right now, I’m hoping for an end to lockdown and a return to a more normal way of life. But more than that, I’m hoping we can carry on all the positive things from this past year; more remote working, seeing more of our kids and getting more in touch with nature!
Needle felting
If you’ve not tried needle felting, you should! I’ve such a beautiful, accessible craft. You really don’t need special skills so you can jump right in a get creative, making 2D art or 3D sculptures. You start with handfuls of fluffy wool which you stab repeatedly with a special felting needle. This action meshes the wool fibres together and creates felt in any shape you like!
My introduction to this craft was creating a dog sculpture, it was super fun but I find that, when you’re new to needle felting, animals can come out looking a little off. I always make sure that Craft Box Club craft kits are really easy for beginners and that anyone can get a great result. That’s why I love the heart shapes in this garland. They are so familiar and easy to sculpt. They also feel so nice and squishy in your hand!
Top Tips for beginners
Start simple - Just get used to the action to begin with, craft a simple shape in one colour
Believe! - This is one of many crafts which a little patience really pays off. It’s hard to believe that stabbing some wool with a needle will do anything at all, but stick at it will all happen in front of your eyes!
Be careful! - Felting needles are really sharp and it’s easy to get distracted while your felting. Make sure you keep your fingers out of the way.
Get the right kit - There are a range of grades of felting needle out there. Some will felt fast but will be hard to get the detail, others will take ages to get a result. Do your research before you buy, or, hey let us do that for you and grab this kit.
Get creative - Experiment with loads of different shapes and colour combinations.
Craft plastic free - It’s really not been a challenge to make this kit plastic free. If you want to take this craft further, buy awesome quality wool and ask for plastic free packaging. I buy from World of Wool who will pack plastic free on request and have great natural products in beautiful colours.

The heart garland!
These materials are awesome!
As usual, this kit is plastic free, that’s the packaging, the materials and the tools! It’s such a cool kit to open, the first thing that will catch your eye is a brightly coloured rainbow of wool! You’ve got just the right kind of felting needle and some brilliant heart templates to make your shaping super simple!
Another great thing about this kit is that you get some stuff that you can reuse for other creative fun! The heart templates can be used as cookie cutters and the sponge (made of wood fibres) which you use as a base for felting, can or course be reused as a kitchen sponge or for various other more artistic purposes.

The needle felting craft box!
Go Get creative
I just know this kit is going to be a hit!
Not signed up yet? Just click the button below to explore beautiful eco friendly crafting. Start your creative journey here!

New kit: Lino Cut Letters
An eco friendly twist on an awesome traditional craft

The new Lino printing letters kit
22nd January 2021
I know I always say that every craft is my favourite, but this one takes me right back to school! I’d never really felt comfortable in art class. I’d never thought of myself as being creative. I thought, “even my handwriting is terrible, how can I be good at art!?”. But then we had a class on lino cutting and printing. I absolutely loved it! Cutting the lino is a brilliant process, it’s also super forgiving and great for beginners as you can sketch out your design on the lino and then shape it as you cut.
The eco friendly twist
Lino printing isn’t new, it’s been used to make art since the turn of the 20th century. Linoleum itself, although it looks like plastic, actually isn’t! It’s made from things like sawdust and cork all held together with pine resin and burlap. There are modern, plastic versions out there, but we’ve gone traditional and biodegradable.
Printing ink can be made from all sorts of things but it usually contains acrylic which isn’t the best for the environment by itself and needs a plastic container. We’ve made the swap to natural earth paint that you can mix yourself. Totally not toxic and it can be packaged in paper!
The sponge that you’ll use to apply the paint to your stamp is made of wood fibres! To be honest, before researching this kit, I didn’t even know they were a thing. A super easy eco kitchen swap! You can pick them up from my friends at Peace with the Wild.
Finally, you also get lots of brown recycled paper cards to print on! The black mono print looks super cool on the brown card!

The box!
The design
You can go really complex and detailed with lino cutting, but at Craft Box Club, we prefer to start simple! This design is based around a letter and tree silhouette template. Both letters and leaves are super easy to cut and they produce an awesome effect as well. If you’re going for your own design, try to keep it simple to start with before experimenting with all the amazing effects you can get from a lino cut!
Oh and it’s A because I’m Adam but the kit contains templates for the whole alphabet!

Go Get creative
I really hope you enjoy this kit!
Not signed up yet? Just click the button below to explore beautiful eco friendly crafting. Start your creative journey here!

We're here to help!
Here to help get your crafting!

Here to get you crafting
2/1/2021
We’ve been wracking out brains over a little Christmas holiday to think of ways that we can support you in your crafting. We’ve had loads of people joining over Christmas and we’re already starting to see people who want to take up crafting as a new hobby or a new year’s resolution. It’s really exciting and we’re super keen that you have an awesome experience!
So here’s the first thing that we’re offering to all our active subscribers…
oFFICE HOURS/Drop in sessions/crafting sos!
You can now book 30 minute sessions, over the phone or via video conference so you can have personal help if you’re getting stuck. Just find a time that suits you, it’s that easy! Don’t be afraid! We’ll find out where you’ve gone wrong and, if possible, craft along with you to get you right back on track!
Easily find a craft guide
You have a link to the online craft guide in each kit plus a QR code that takes you right to the page you need. We know that sometimes that’s a bit fiddly, so we’ve created a library of all of our craft guides. Find your kit and click the link.
All this can be found on our new Members Hub…
This service is only available to active subscribers, not signed up yet? Hit the button below and join our super community of eco crafters!
HAPPY CRAFTING!

New kit: Pom pom and Tassel Christmas Rings
Introducing this year’s Christmas Craft Kit!

Introducing the Christmas Craft Kit
21th November 2020
Here it is, in all it’s glory, our Christmas Craft Box! I’ve been planning this for ages and I’m really please with how it’s turned out. I think you’ll really love learning how to make pom poms and tassels. I really wanted this Christmas box to be something that you could make and show off at Christmas but that didn’t look out of place hanging up in your home all year round. These magic rings look great on a Christmas tree or hung up as a wall hanging. The video for this kit is super fun. I’ve loved finding Christmas music to a little bit of extra Christmas sparkle to give you a Christmas crafting boost. I’m so excited that people getting this kit as a Christmas present might get all the family round YouTube to watch the video on Christmas day. Let’s hope we can get together with our loved ones safely this year!
Making Pom poms
I hope you love making pom poms as much as I have! They’re so versatile, they can be used to make so many things! The wreath below is made from all my left over yarn from this year. I really love it! Huffle the penguin is made of poms too! Amazing huh? Who else loves the googly eyes?
The kit shows you how to make poms the traditional way but if you want to make enough pom poms to make a wreath like this then I’d recommend getting yourself a pom pom maker. I’ve tested loads recently. There are wooden pom makers available but I’m sad to say that I don’t think they’re as good as the plastic ones. I don’t mind recomending these plastic pom makers though as they’re well made and you’ll get so much enjoyment from them! Here is a link to a pom making craft kit from my friends which includes the good makers.

Pom pom wreath
Tassels
You can use tassels to add a bit of glitz to loads of craft projects. I couldn’t believe they were so easy to make! All you need is your hand and a pair of scissors! A great one for Christmas crafting with the family this year!
Pom and Tassel history
Did you know there are references to tassels in the bible!? In the Hebrew Bible, the Lord spoke to Moses instructing him to tell the Israelites to make tassels on the corners of their garments, to help them to remember all the commandments of the Lord and to keep them and as a sign of holiness. They have been widely adopted as a symbol of status to adorn clothing and furnishings over the years.
Pom poms have their routes as a military decoration for topping hats. The colour, shape or size of the poms helped soldiers to differentiate between regiments. Meanwhile, off the battlefield, the pom-pom held great significance as well. In South America, traditional garments of both men and women were being decorated with differently colored pom-poms as a signal of their marital status. In Rome, clergymen wore square-peaked caps called birettas. The color of the pom-pom that crowned each biretta signified the wearer's order.
Let’s not forget their use as part of traditional dress in Scotland. Men wore a floppy beret called a Balmoral bonnet that was topped with a bright red pom-pom iconically known as a Tam o’ Shanter. Check out some lovely examples on Esty.
Go Get creative
I really hope you enjoy this kit!
Not signed up yet? Just click the button below to explore beautiful eco friendly crafting. Start your creative journey here!
MERRY CHRISTMAS

New kit: Wool and Rope Basket Weaving
So much fun and an amazingly useful skill to learn!

The wool and rope basket weaving kit
13th November 2020
This has been on my crafting wish list for ages! Yes it’s a long list. I’ve been inspired by the rope and wool rainbows that have been everywhere this year but I wanted to see whether I could use a similar technique to create a basket. I think it’s worked really well. The traditional stitches provide the strength to the basket and the wool provides the colour and a lovely fluffy feel.
It’s all about the rope
After doing loads of research on rope baskets and having a couple of failed attempts, I’ve discovered that the type of rope you use is super important. Lots of rope is made from plastic which is horrible to work with and especially tough to get a needle through it. This craft kit uses cotton rope, making everything much easier!

The finished basket
craft history
It’s widely thought that basket weaving is one of the oldest known crafts. Just imagine how useful it would have been to turn materials like sticks and grass into baskets to help carry things long distances! The process of interweaving twigs, seeds, or leaves for baskets and mat making is one of the most universal crafts, ranking among the most ancient industries.
As these baskets would have been made from natural materials very few of them survive. However, the weaving techniques have been passed down through the generations and they survive to this day!
The oldest known baskets were unearthed in Faiyum in upper Egypt; radiocarbon dating has shown them to be between 10,000 and 12,000 years old. Other Middle Eastern sites have produced baskets up to 7,000 years old. The earliest dates for baskets are older than any yet established for pottery.
New craft kit testing team
I’ve started to test all the new crafts out with my girlfriend Emma. We had the best afternoon making this kit together and checking that it would be easy and fun for all the awesome CBC subscribers to do. We’re going to do this now with every kit as our little crafty partnership starts to develop.
Thanks Emma!

Beautiful merino wool
Go Get creative
I really hope you enjoy this kit!
Not signed up yet? Just click the button below to explore beautiful eco friendly crafting. Start your creative journey here!

New kit: Circular loom weaving
Super soft crafting!

Introdction to Circular Loom Weaving
12th October 2020
Another month flies by and once again I’ve found the very best crafts for you using no plastic and lovely natural materials! I feel like I’ve really struck gold with this one! Here’s the story behind the kit…
Find inspiration everywhere!
You know those days when you don’t really have much planned but you just take yourself on a mini adventure? Don’t you find that they’re always the best ones? The one’s you remember and the days that give you the biggest boost.
Last month, my girlfriend Emma and I met up for a countryside walk. We pretty much just picked the spot that was between us on the map and that had free parking. We ended up on Overton in Hampshire. Actually really lovely! Super coffee and a nice walk!
We drove around for a bit after the walk to find a picnic spot and by complete chance, and slight hungry desperation on my part, stopped at Whitchurch Silk Mill. Aside from being absolutely stunning outside, I loved having a look around the looms and other machinery, which would have originally all been powered by water wheel.

Inside the mill
I left feeling really inspired to have a go at some basic loom weaving and I’m so pleased to be bringing this craft to you!
History of loom weaving
Humans have been weaving since the Palaeolithic era. Flax weavings are found in Fayum, Egypt, dating from around 5000 BC so we’ve been weaving for a very long time to produce fabric for all kinds of uses. The process has undergone several stages of improvement and industrialisation over history including during the Industrial revolution when weaving switched from hand to machine. John Kay invented the flying shuttle in 1733 and enabled weaving of wider fabric as well as made it faster. The first factories for weaving were built in 1785. The Jacquard loom was invented in about 1803. It could be programmed with punch cards which enabled faster weaving of more complicated patterns.
merino wool
I want to take you back to hand weaving and help you get to grips with these wonderful materials shown below. This kit includes merino wool from Yorkshire which is one of the most sustainable materials. The wool comes from Merino sheep which is prized for it’s soft feel and it’s strength among many other qualities. If you’d like to find out more about it then I can seriously recommend watching this film!
Beautiful merino wool
Go Get creative
I really hope you enjoy this kit!
Not signed up yet? Just click the button below to explore beautiful eco friendly crafting. Start your creative journey here!

New kit! Paper Quilled Jewellery Set
Behind the scenes of making this kit…

Behind the scenes!
9th September 2020
Aaand it's ready! The lastest craft from Craft Box Club! I know I always say it, but I’m really proud of this one. The kits just keep getting better and better. In this one you get everything you need to make two earrings and a pendant from beautiful, little coloured coils of paper. Magic! There’s also loads of extra paper in the kit too so you can go ahead and change the colours. You can also experiment with loads of other designs too!
I’m so pleased that this kit is out in the world. Although it was inspired by summer flowers, the heat in the studio was super intense! I do not recommend quilling when it’s over 30c! Sweaty hands and paper = mess! It’s been a mega busy time over the summer and I’ve not been able to blog and chat to everyone as much as I’d like but I’m back on it now and ready for the next kit!
To make this kit extra special and keep the plastic in the supply chain down to an absolute minimum I’ve partnered with two other businesses who share my values. Check out the guide for more information and links. I’ve loved working with other crafters to make custom pieces for this set. It’s totally worth it for the planet and I love the feel of wooden tools rather than plastic.
Jewellery making
I really love making jewellery. There’s more to think about than if you’re just making some art for the wall. It’s got to work as well as look good. It’s been really fun working on the flower and teardrop design for this kit. I’ve not seen anything else quite like it so they really stand out. The techniques used aren’t to complicated either and are definitely suitable for beginners. Towards the end of this make there’s a little bit of wire wrapping. I really enjoy working the metal as you have to be gentle but firm to get the effect you want. The flat coiled wire attachment came after about an hour of trying other designs that were either way too tricky or just didn’t work properly. I’m really pleased with them. Let me know what you think!
Top tips for making paper quilled jewellery
Take your time and be methodical – there are a few stages to making this design. Work methodically making all the individual pieces you need before you complete the final design.
Don’t use too much glue – quilling paper is really thin. Using too much glue makes it all wet and ruins the neatness of the design.
Use the quilling template – particularly if you’re making flower designs it’s good to get everything to look uniform.
Embrace bright colours – I love all the colours in this kit. It was hard to narrow them down. These are bold statement pieces so go bright or go home!
Happy crafting!
JOIN THE MAKER MOVEMENT
If you’d like to learn the skills to start making your own beautiful and useful things, join us today! It won’t cost the Earth!

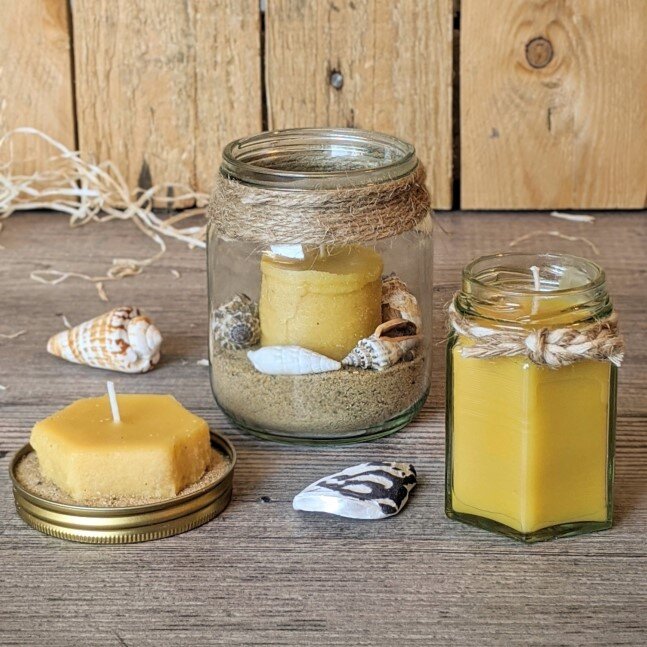
New kit! - Sand Cast Candles
Introducing our latest amazing craft kit!
Introducing our latest craft kit
It’s that time again! Every month I dive into a totally new craft and make up a brilliant super cool and totally unique craft kit for you to try. This month I’m making candles! Yay!
Using natural materials
Beeswax
These candles are made from beeswax, the same blocks we use for our beeswax wraps kit. Unlike candles made from other wax, beeswax candles burn brighter and cleaner as they emit negative ions that are known to help purify the air. Beeswax also smells great when burned without any added chemicals or scents, as it’s naturally aromatic from the honey and flower nectar that’s found in the honeycomb.
Shells
I’ve gone to incredible lengths to search for responsibly sourced seashells to decorate one of the candle designs. The majority are from UK waters and from the seafood industry. Many craft shells you’ll find are not sourced responsibly and can be part of widespread habitat destruction. These candles are nice and all but not worth destroying the planet over. So we made a better choice. They are absolutely beautiful and were delivered to me plastic free.
sand Casting
There are many many candle moulds out there made from plastic, silicone and all sorts. I wanted to stick to using natural materials. I also thought of all the candle moulds that have been bought to play with and only ever used once. I really didn’t want to add that that pile of waste so I was really pleased to discover sand casting!
What is sand casting?
Sand casting is just what it sounds like! Casting candles with a mould made from sand! Love making sand castles? Haven’t made it to the beach this summer? You’ve in luck! To make the casts you get the sand “sand castle” wet, then shape it around anything you want the candle to look like. I’ve provided a cardboard tube and a hexagonal jar to use as moulds but you can really use anything solid! Once you’ve made the mould, place your wick in the middle and pour in your molten wax. Let it cool and then you’re done!
Sand cast candle top tips
Be careful - You don’t need to get your wax very hot, in fact the cooler the better. But it’s very easy to forget that 100c is still HOT!
Beware sink holes - These are holes that appear in the middle of your candle after the wax has cooled. They can really mess your candle up so watch out! I’ve tried all the tips to prevent them but found that none of them really work. Best to embrace them! Leave a small amount of wax behind after your first pour then pour the rest into your sink hole later. Solved!
Smooth your casts - Get those sand casts as neat as possible before your pour the wax. Once you pour, there’s no going back!
This kit is now ready to go. It’s amazing! You make 3 totally different candles from a single kit! Want to try? Sign up below and reply to the welcome email asking for this kit!

A Paper Quilling Quest
A beginners guide to quilling…
An introduction to Paper Quilling for Beginners
Each month I learn a new craft, create a unique design and make up awesome video guided kits to introduce my wonderful subscribers to a the craft.There’s magic in this method as it means that I have all the mistakes, the hard parts and how to solve problems fresh in my mind. It also means that every month I get to share how it feels to learn a new technique and use it to create something I’m proud of.
Err… what is Paper Quilling?
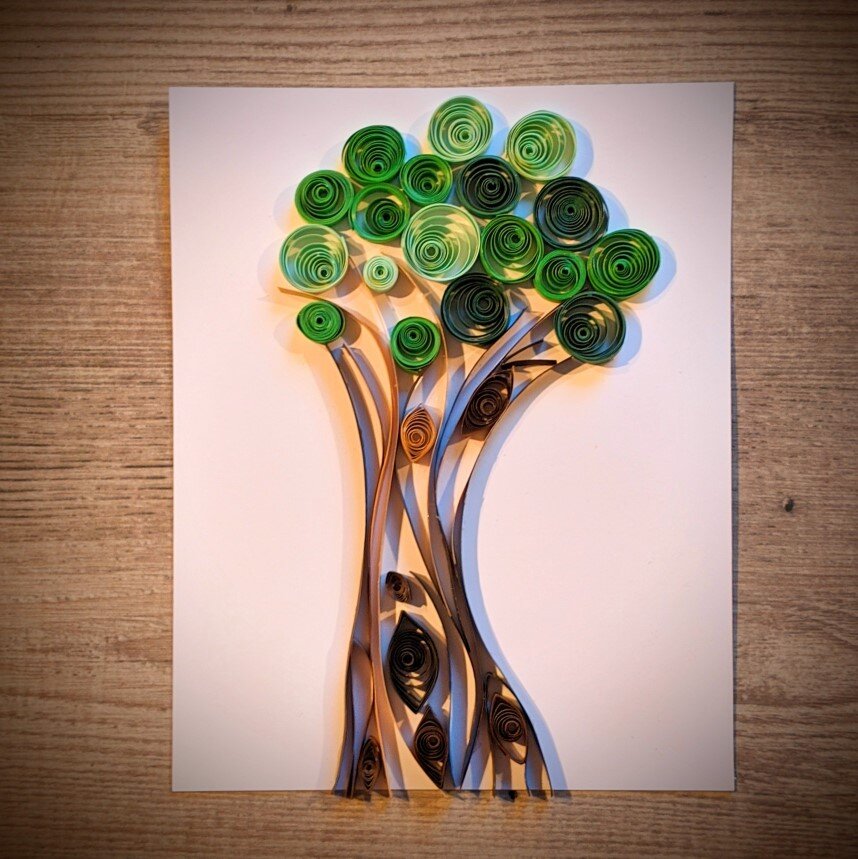
So, yeah, it sounds like a naughty word right? Anyone else? So quilling is art made from long strips of colourful paper that is often coiled using a quilling needle. You can see the effect you get in the photo at the top of this page. Once the paper is shaped as you want it, you can stick it to the page using pretty much any glue and you get these beautiful 3D pictures.
Why Paper Quilling?
I was attracted to quilling ages ago because of the brightly coloured paper and the amazing range of designs you can make. I’ve had my quilling paper sitting on a shelf for about a year but just never found the time to get making. Since going plastic free at the start of this year I thought paper quilling would be the perfect eco craft kit. But, it was harder than I thought to make this kit plastic free as most of the stuff you can buy is made of plastic and the paper always comes plastic wrapped. Luckily I found someone who will make wooden quilling needles for me, the other half I’m making myself, in house. So exciting!
What’s it like to do?
I loved doing it! I’ve never done it before and I’m pretty happy with my first attempt at the top of the page. It’s really suited to organic forms like trees and flowers as you can use the paper strips to get all the curves of the tree without much fuss. I really can’t draw so I’d find it really tough to get all the curves the way I wanted them using a pencil, but the paper strips are perfect!
Above all, it feels great. Making the paper circles is a lovely action and super relaxing and it’s so beginner friendly. Definitely one to try!
Beginner quilling top tips
Go freestyle - Don’t worry too much about a set design. Do for something organic like trees, leaves or flowers.
Make your paper quills/circles first - before you get into your design, make up a load of circles using your quilling tool so they’re ready to use.
Dip don’t spread - it’s way easier to have a little pool of glue to dip your paper into rather than trying to spread the glue directly onto the paper.
I’m working on a final design and a guide for this craft now so follow me on social media to hear when it’s going live. Once that’s done, the kit will be going out to all my lovely subscribers! Can’t wait for you all to have a go!

Earth Paint Love and Salt Dough Top Tips
Do you miss the beach? Me too! Here’s some seaside crafting for you
New earth paint & salt dough jewellery kit
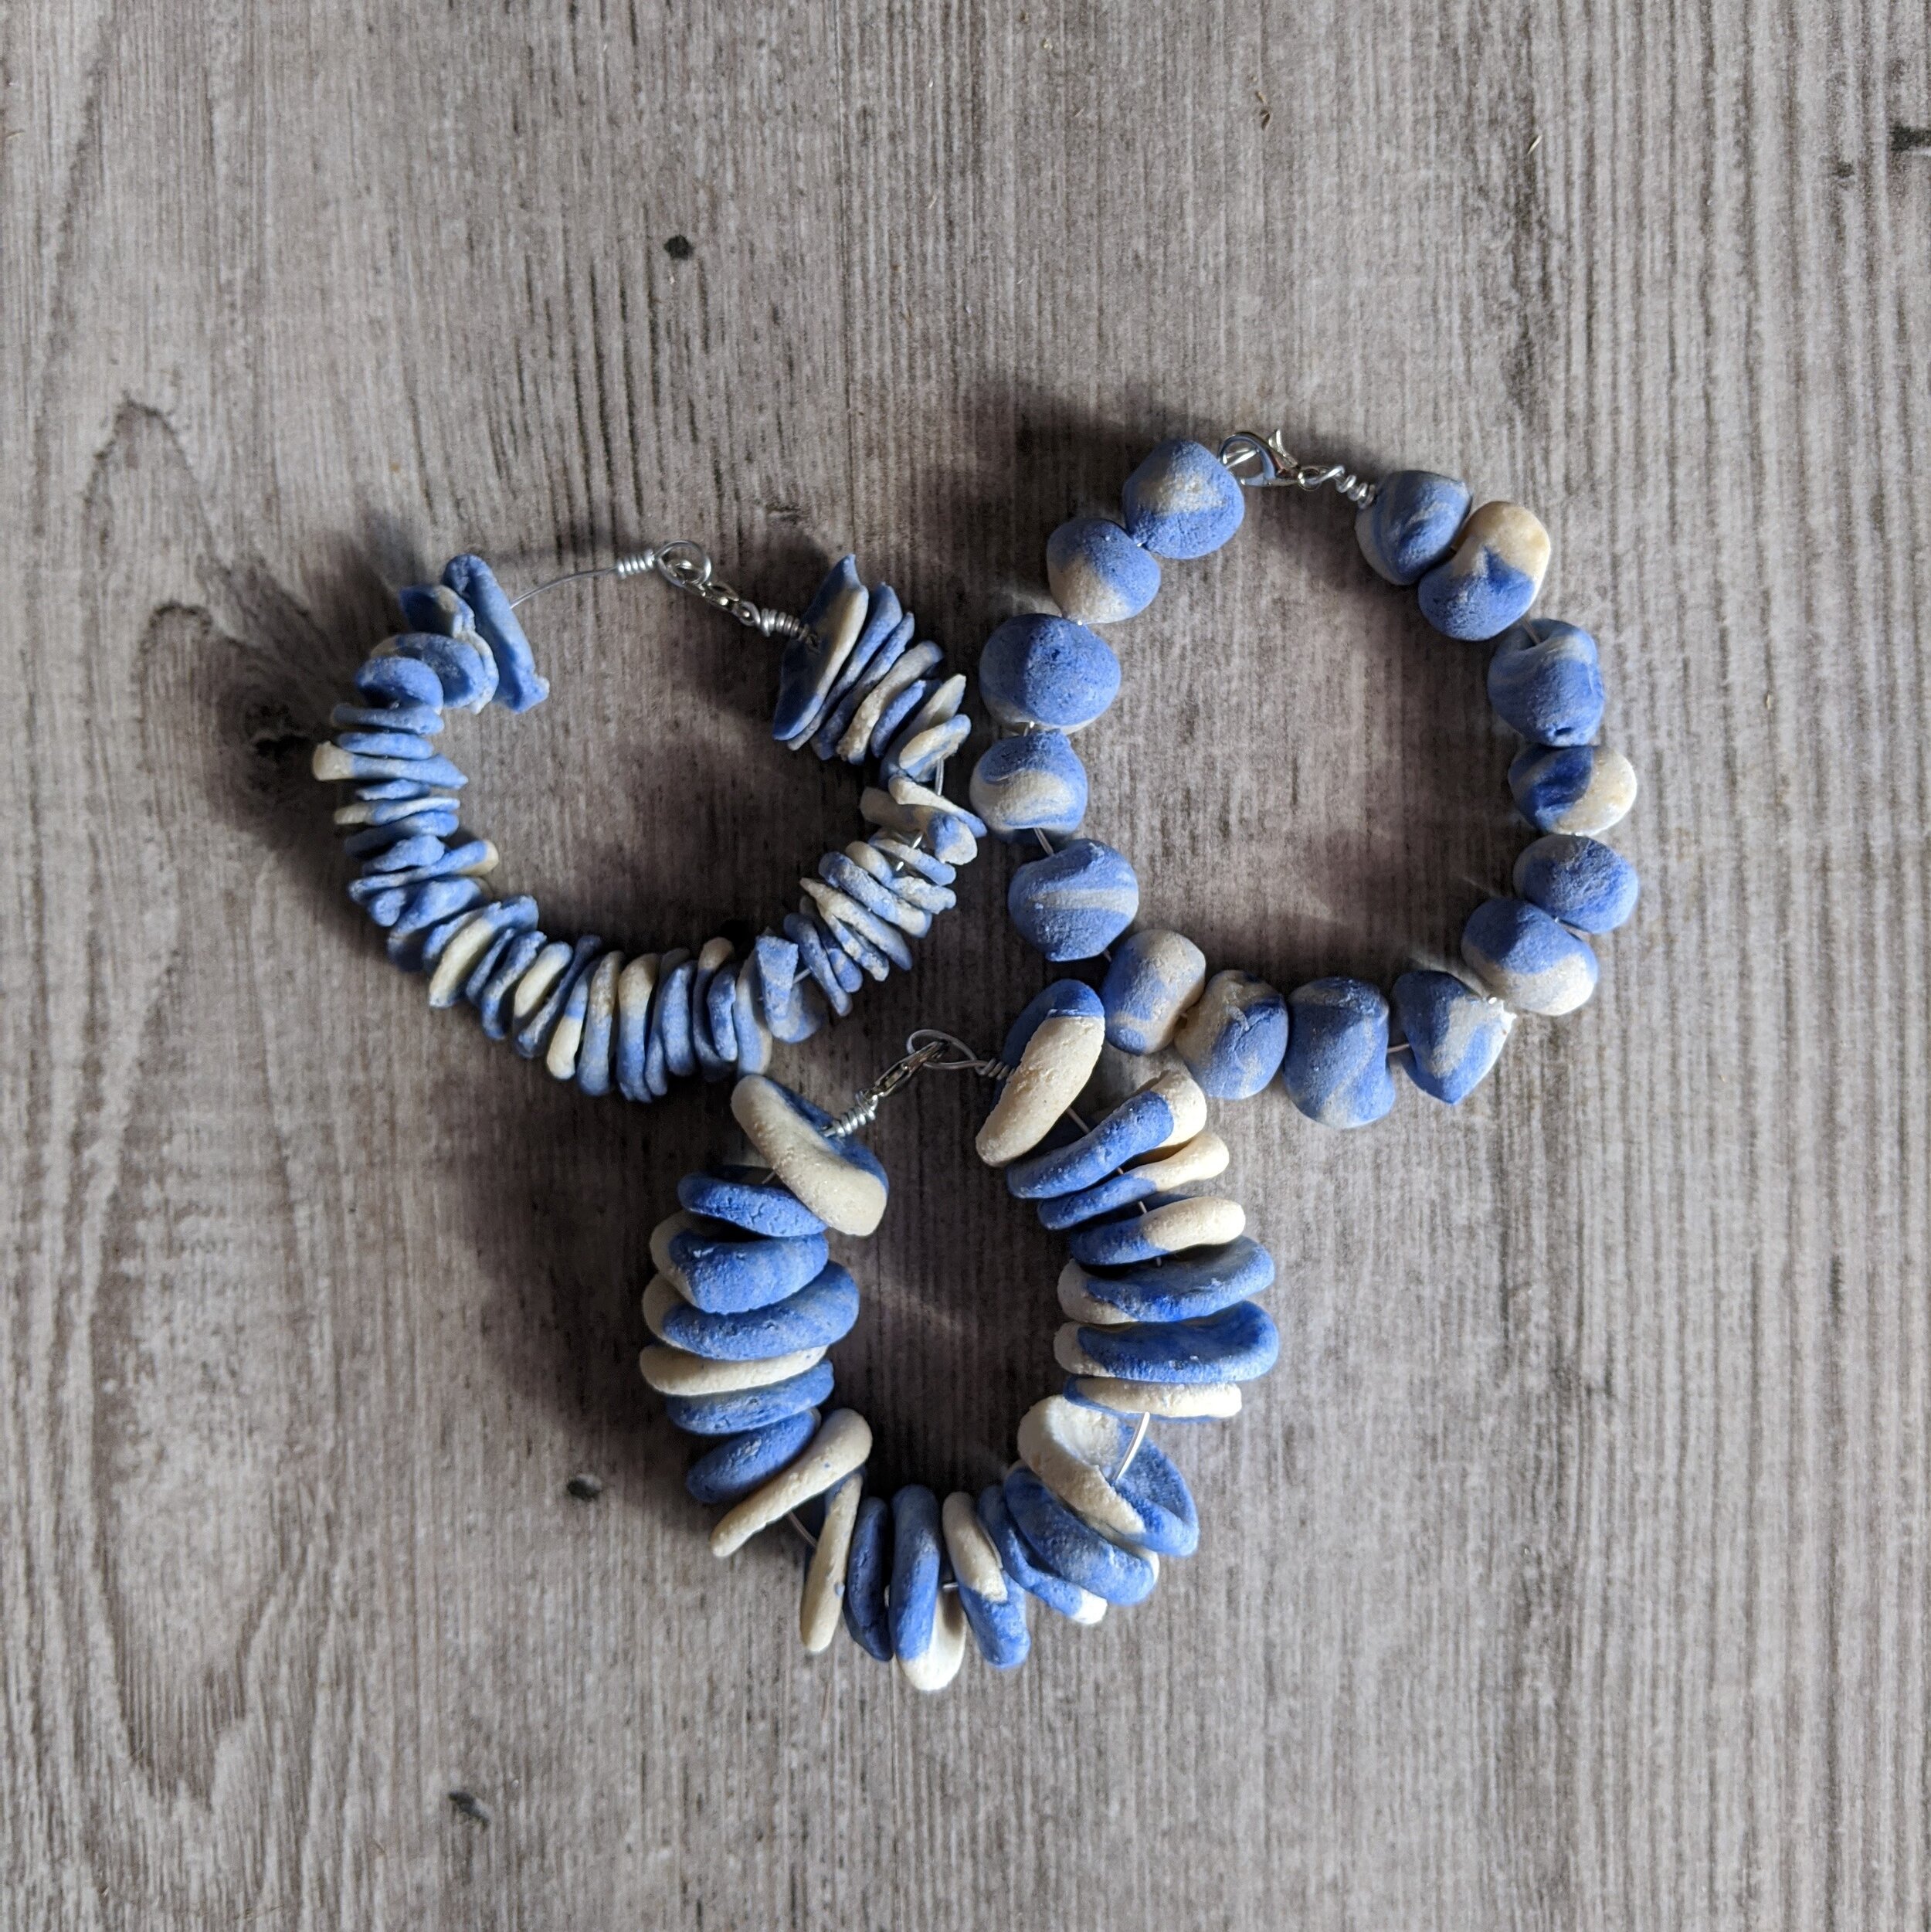
I love this kit. Really love it! At Craft Box Club we have an ongoing commitment to plastic free, non-toxic crafting and this kit just fits in perfectly! You make a white and a blue salt dough, then shape different kinds of beads to make three beautiful bracelets.
Introducing EArth Paint
Earth paints are non-toxic powdered paints make from earth minerals. They work really well in our craft kits because they are much easier to package plastic free than traditional liquid paint which need to go in plastic bottles.
This radiant blue pigment is fired to get this vibrant colour. It is composed of 90% earthen clay and 10% man-made, non-toxic minerals, and it is heated in an oven to a high temperature.
Throughout history, blues in nature were very rare and usually made with precious stones like Lapis Lazuli. These stones are now unsustainably harvested in Afghanistan, so we use this beautiful, non-toxic and sustainably-made alternative.
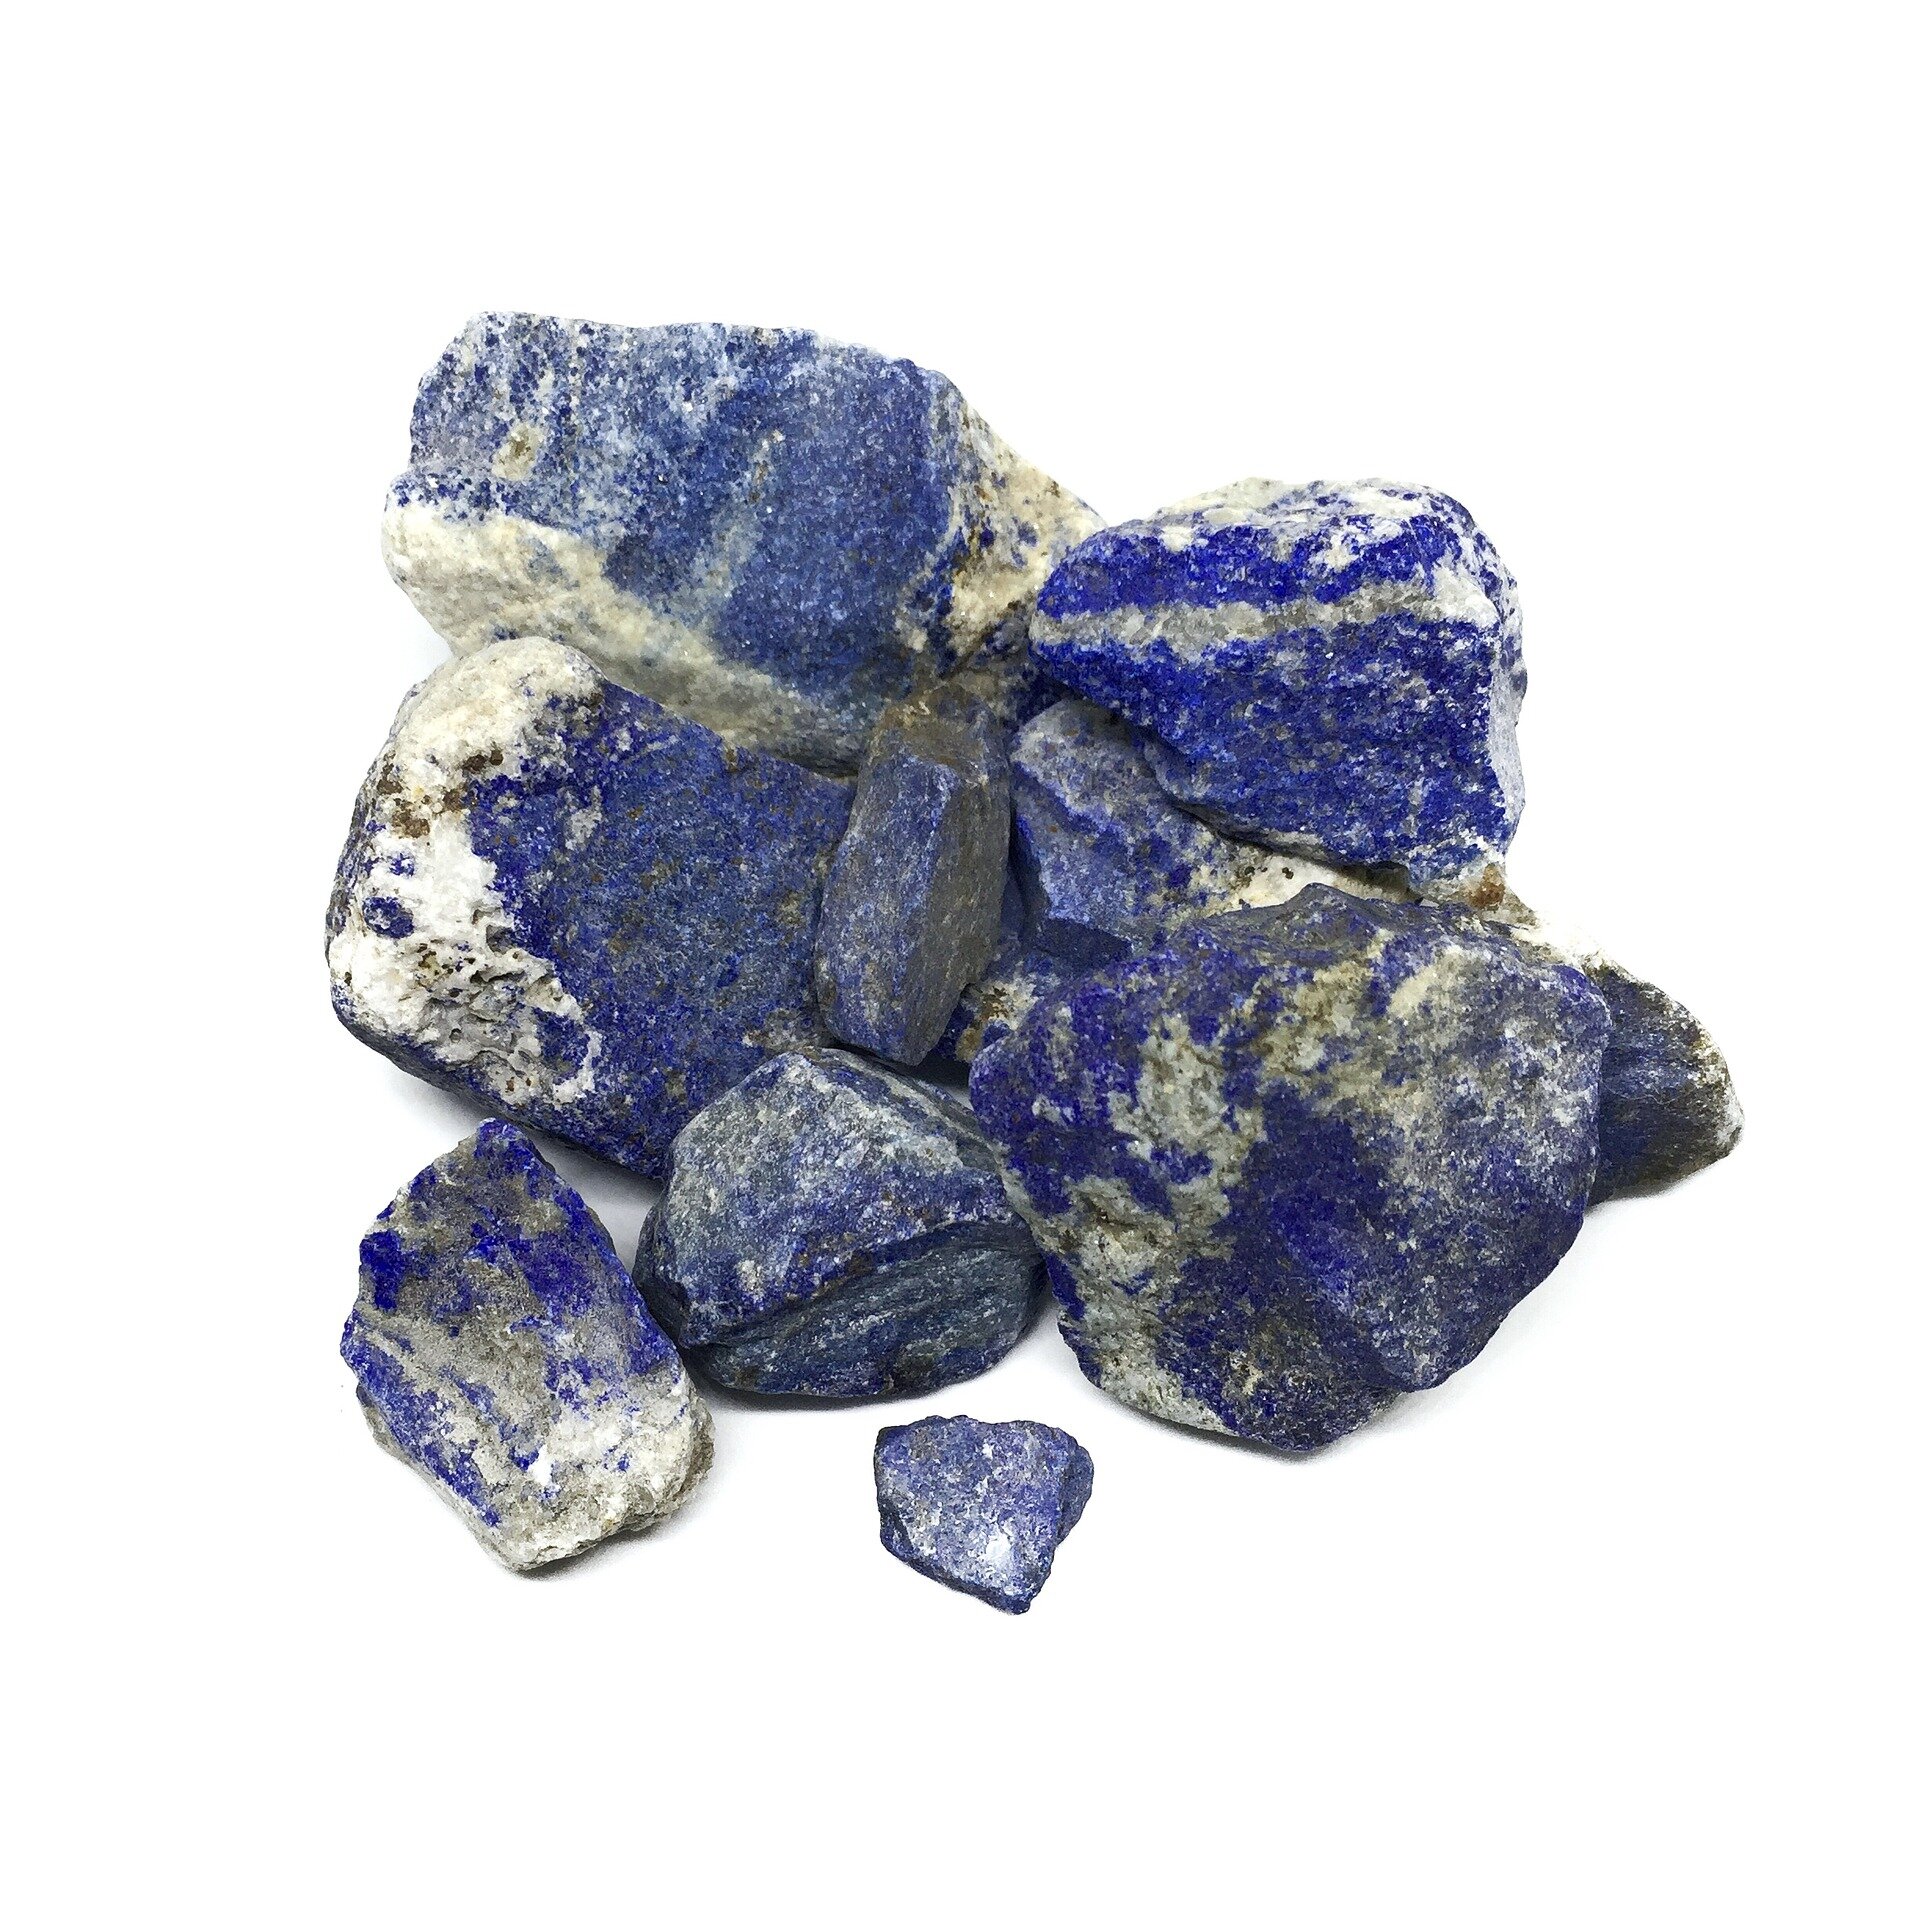
Lapis Lazuli
What inspired this kit?
I love the beach! I don’t live by the sea but a visit to a sandy shoreline really energises me. Every year i set a target of ten beach trips just to make sure it happens. It looks like that might be tough this year with the world in a Corona lock down but I wanted to use the beach as an inspiration for a craft kit. The beads in this kit, the texture of the salt dough and the vivid blue colour all remind me of trips to the sea.

Top tips for salt dough success
Follow the recipe - 2 cups flour, 1 cup salt, 1 cup water.
Knead for a good 10 minutes until the dough is smooth.
Use the dough right away or the gluten relaxes and the dough goes soggy. If you do want to put it aside, leave it in a jam jar and add some more flour to it when you could back to it.
Use plain flour not self raising!
Make a dry dough. Wet dough is harder to handle and won’t keep its shape.
Dry your creations out slowly! For best and more eco-friendly results, dry in the sunshine. Too much heat causes cracks.
If you’re making beads keep an eye on the holes through the middle, the dough swells as it dries and holes close up.
Experiment! You can make so many shapes with salt dough, just keep on creating!
Fancy getting more creative? Join Craft Box Club today and get a totally different craft delivered to your door every month or join our mailing list below and get free creative challenges to do every week!

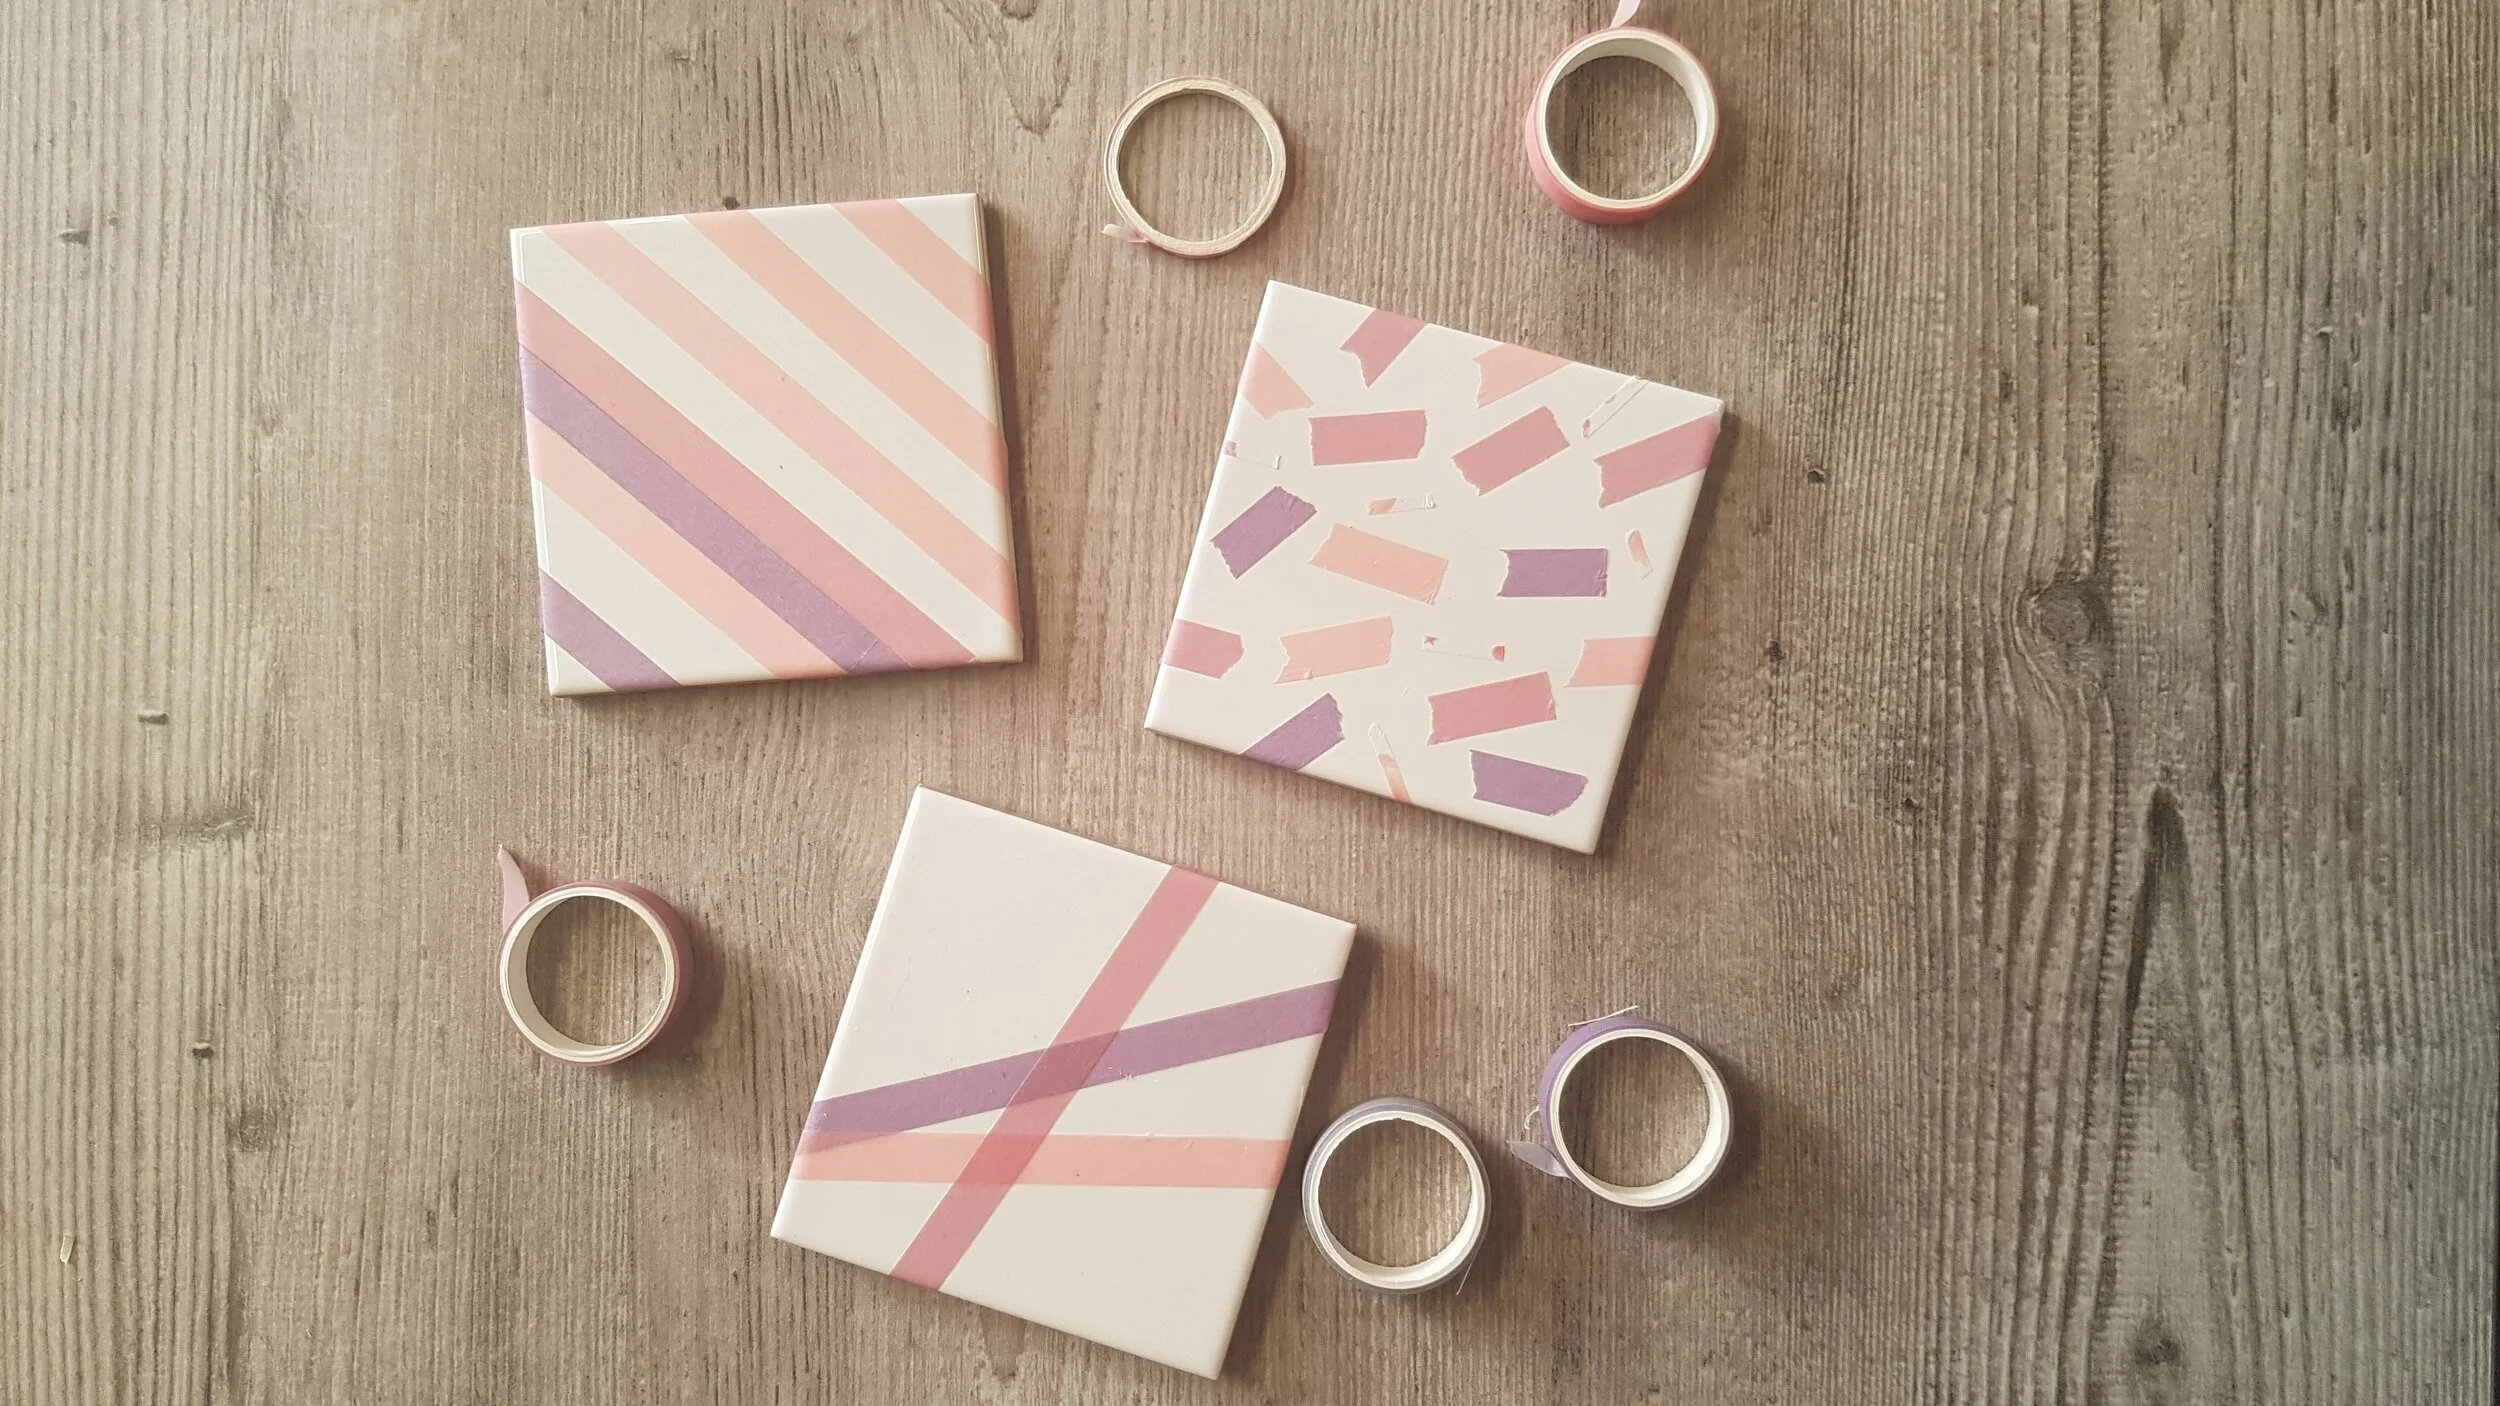
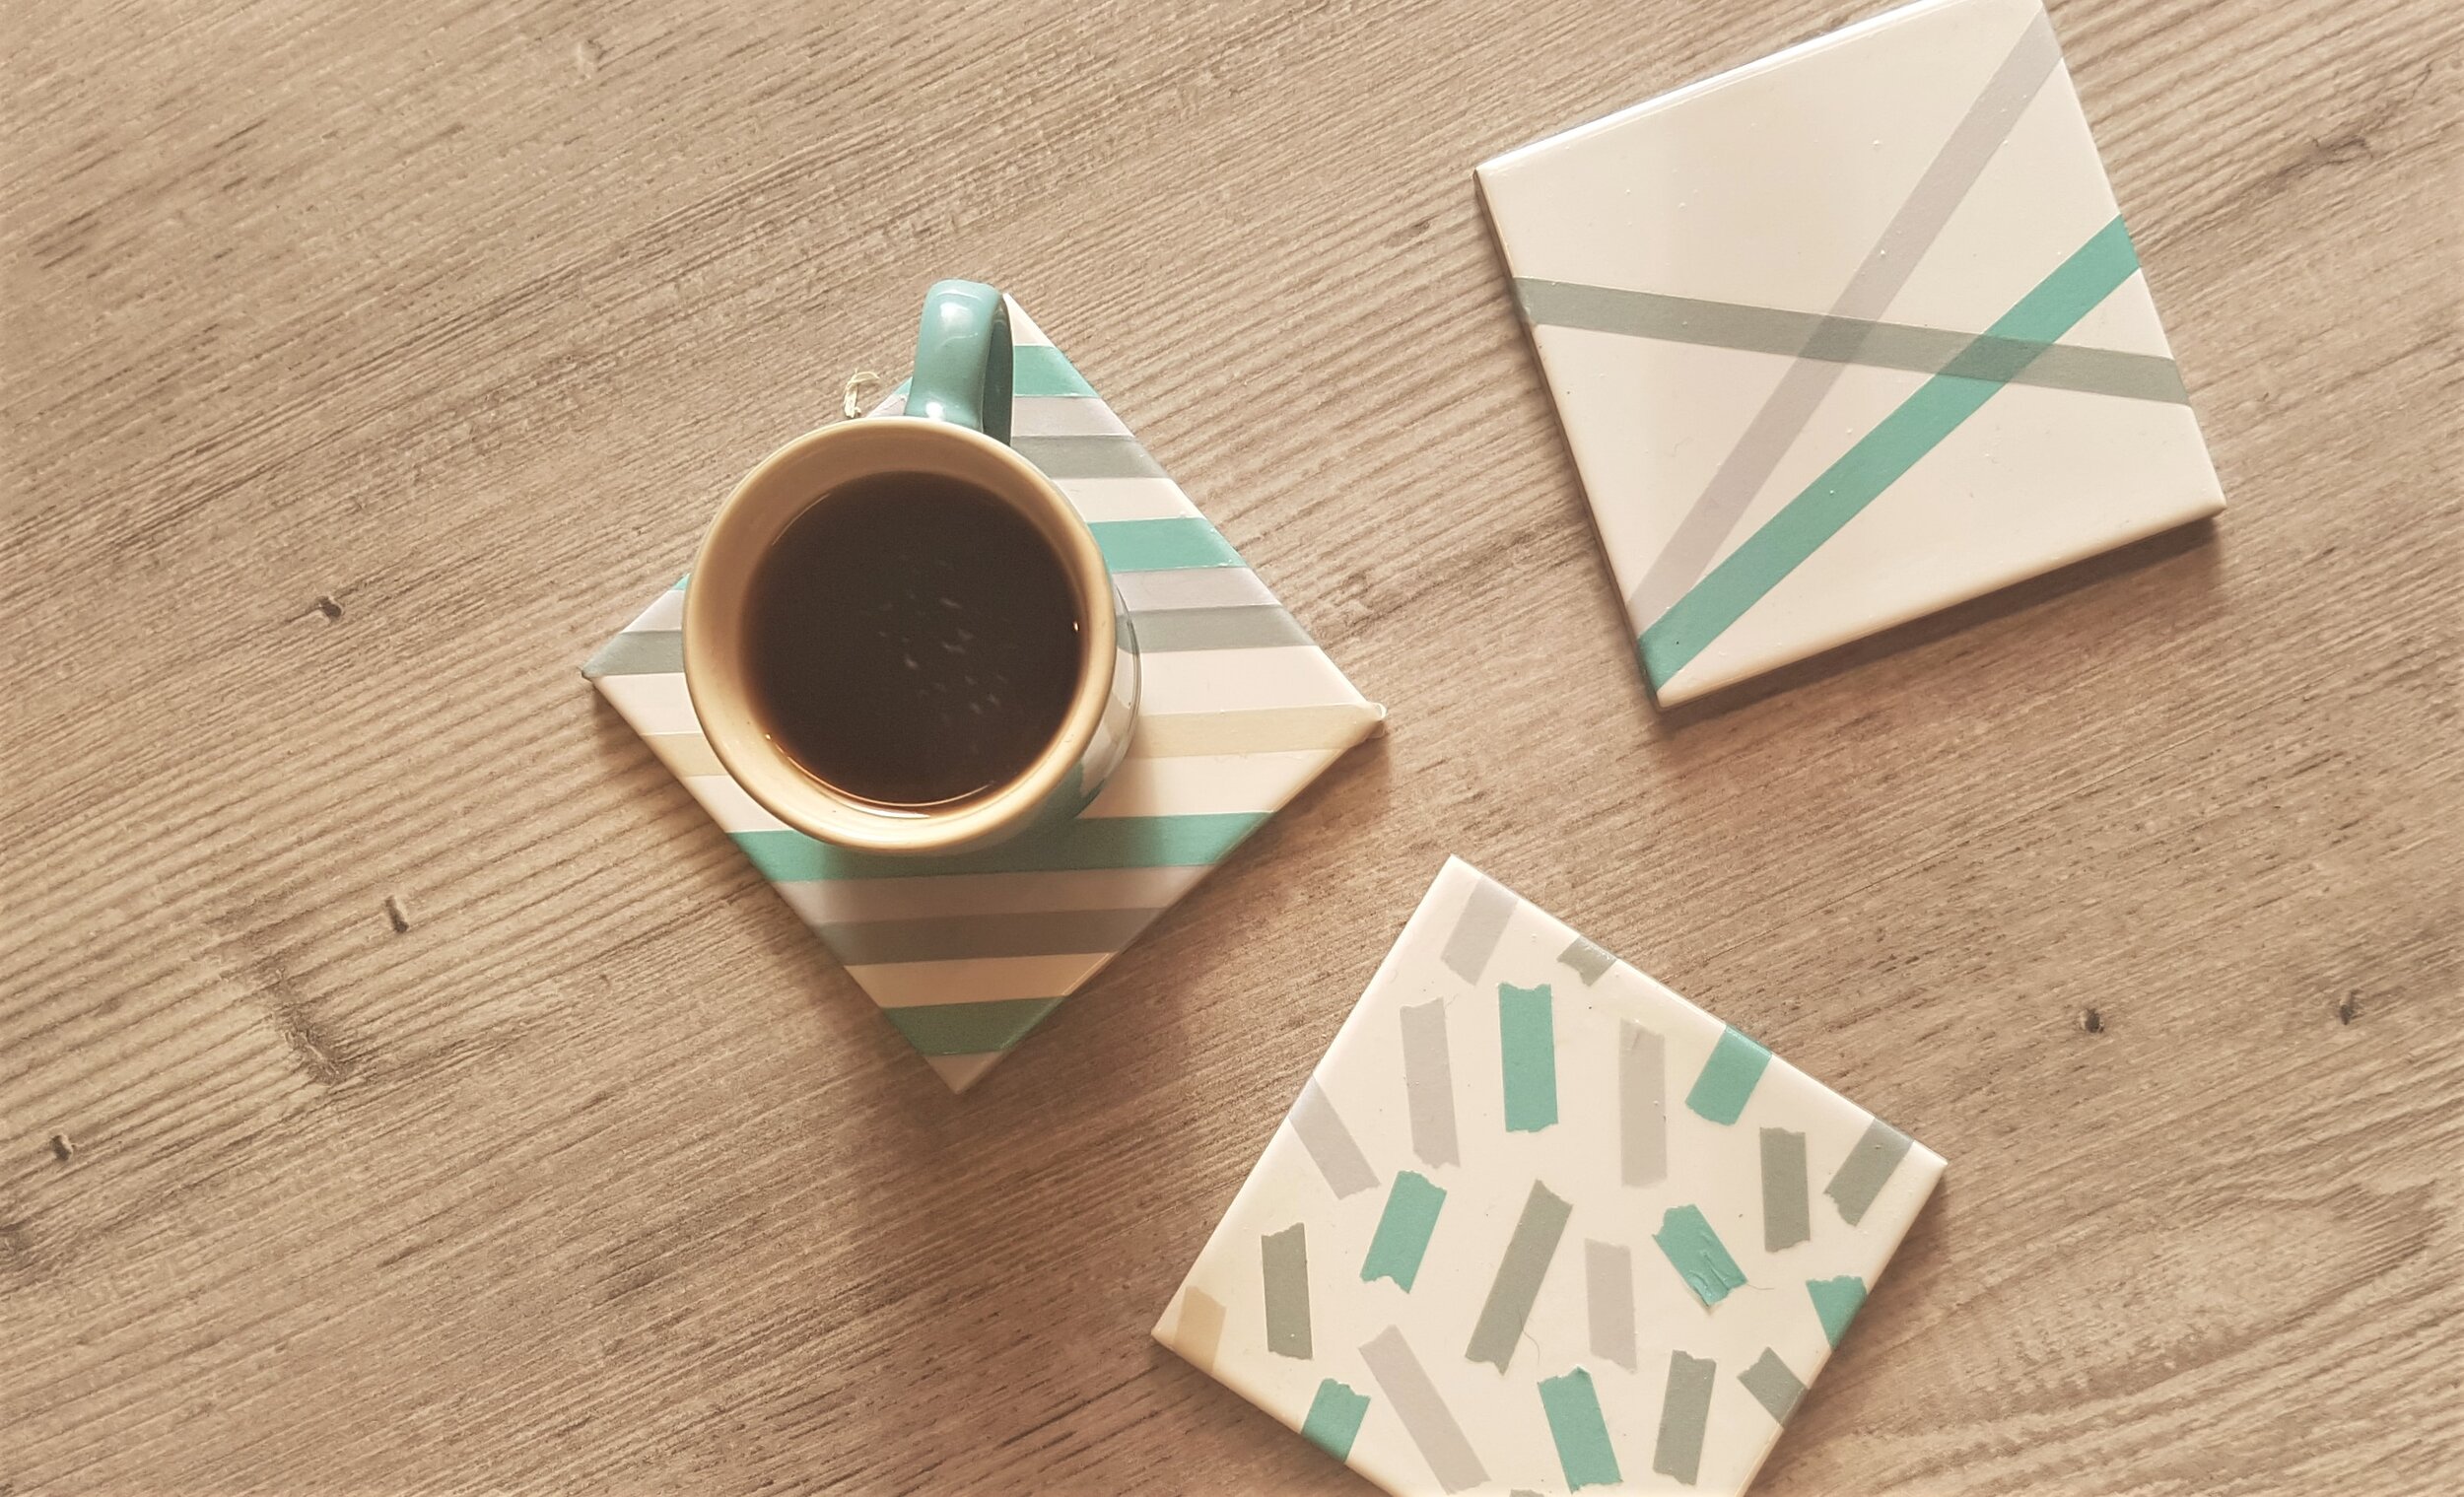
Introducing the Washi tape coaster kit
Instant coasters with your own unique design!

Hot off the press, I’m pleased to be introducing the new Washi tape coasters craft kit! Coming soon to subscribers across the UK.
I just love how this kit looks. The mix of natural colours and textures with the bright white tiles and the flash of the tin looks great against the colour pops from the Washi tape.
Errr what is Washi tape, I hear you scream! It is a decorative tape made out of rice paper. Originally from Japan and now every scrapbookers best friend, Washi tape is my new favourite thing. It comes in all the colours of the rainbow, and some awesome patterns too. It is commonly used in art and craft projects, particularly paper crafts.
With this kit, you can play with designs until you’re happy with them. Then, just brush on the sealer and you’ve just created your own unique set of coasters.
Washi Tape, or Japanese masking tape, first originated in Japan by the business Kamoi Kakoshi Co., Ltd. under the name MT masking tape. It all started in 2006 when puzzled Kamoi received an email from a little group of women who developed a book making use of their industrial masking tape. The email stated that they would like to tour their facility before working on a second book utilizing their masking tapes. Confused Kamoi didn’t initially respond to this curious email, and later received a package from the ladies; It contained colourful, beautifully designed pages all carried out in masking tape! Kamoi ultimately agreed to let the ladies tour their facility, and their marvel and fascination at the tape creating process filled Kamoi with fantastic pride. Later, they received a second book filled with a lot more stunning pages from 17 different artists, all employing their masking tape to develop a thing of beauty! The women requested that Kamoi produce much more masking tape colours. Kamoi didn’t hesitate after a big art exhibition in Tokyo and plenty of media coverage; they took the plunge and began to work on producing the excellent rolls to use for crafts and design! They not only created numerous far more colours, but also designs that were cute and functional.
These are my very own set of coasters, the first couple I made. They’re now a permanent feature in the studio! Might have to make more for around the house too!
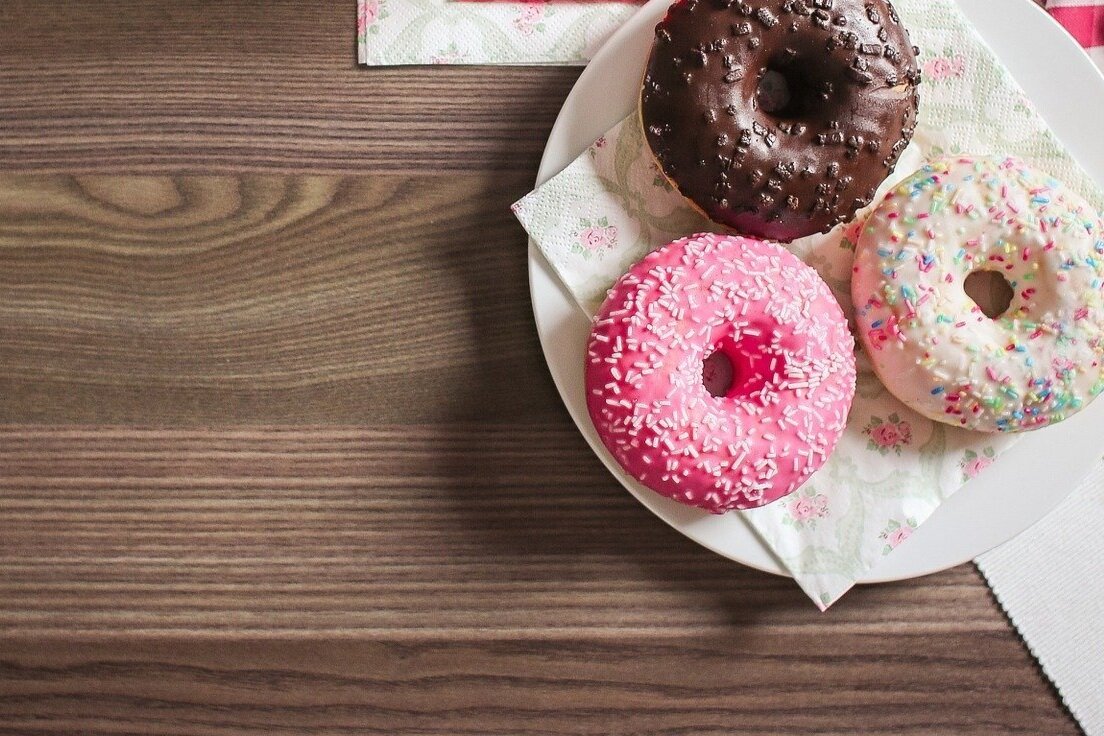
Is it just me of does one of the designs remind you of sprinkles on a doughnut? Mmmm, doughnut anyone?
Fancy having a go at using the kit. Sign up to Craft Box Club and receive simple, plastic free craft kits in the post every month.